|
| Prusik above frozen Gnome Tarn. |
The Enchantment Lakes are one of the most beautiful destinations our state of Washington has to offer. The high alpine lakes are set in granite basins surrounded by larches that turn brilliant gold in fall, and towering peaks above. They attract photographers, hikers and climbers from around the country.
You must have a permit to visit this fantastic place, which encourages one to plan in advance. Of course, if you're feeling lucky, you can roll the dice the morning of by playing their lottery system. Don't get caught without a permit; the rangers patrol the area and strictly enforce the permit policy.
Once the legal obstacles are handled, one must face the physical challenge of the approach, and decide which approach is best for them.
The Snow Lake approach gains 5,700' in ~9.5 miles. Aasgard Pass, a favorite among many, has 1,000' less elevation gain and shorter distance, but uses a climber's path to ascend over a nearly 8,000' pass before descending to the lakes. Neither approach can be classified as easy.
The Enchantment Lakes are best visited from late July through mid-October. Late July-early August will often find the area mostly snow-covered, though peaks are very accessible. Late August and September are the best hiking months; the area is mostly melted out and the weather generally continues to be nice. This is a great time to explore and scramble in the upper basin. October offers the turning of the larches, as well as the seasons. It's common to have a dusting of snow on the ground, making off-trail travel in the upper basin tricky. Though photographic throughout the summer, October offers a photographer's paradise when the larches can be timed right. Unfortunately, the weather can be unpredictable and present challenges. One must be prepared for winter conditions, or to even cancel their trip altogether.
 |
| Larches above Sprite Lake. |
My first October visit to the Enchantment Lakes several years ago hit the larches at their absolute peak, and had fantastic weather from beginning to end. I thought this was the norm. My second visit found poor conditions with snow and heavy clouds. I had to cancel my third visit entirely due to a prior system that dumped heavy snow in the area, and was forecast to last the duration of my visit. I've learned to never take the Enchantments Lakes for granted again!
This year we once again had a system move in ahead of our visit, bringing temperatures in the 20's, and snow. Nine inches of fresh snow were reported at Lake Vivian the day of our entry. As such, we elected to to approach via Snow Lakes. This would offer us a seemingly easier approach under the conditions, as well as an easier bail route should we need to beat a hasty retreat.
 |
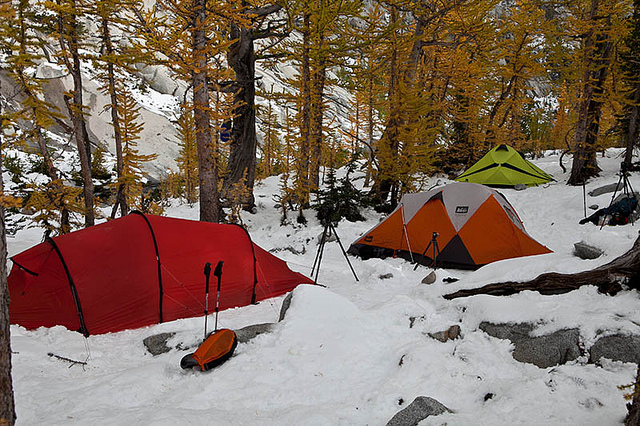
| Camp near Sprite Lake. |
We hiked in under sunny skies, knowing the forecast was for a short window of nice weather before a new system was to threaten our final day.
We arrived at Lake Vivian to find the few backpackers there had been tent-bound the previous day during a blizzard. Reports were that nobody was camped higher.
We continued on to Sprite Lake, arriving after 9 hours of hiking and 5,700' above our starting point. The snow awaited us as promised.
 |
| Prusik Peak Reflection near Leprechaun Lake. |
October Photography
Photography options abound throughout the Enchantment Lakes. But if looking for larches in October, the best option is the lower lakes; Lake Vivian, Leprechaun Lake, Sprite Lake, Perfection Lake, Inspiration Lake and Gnome Tarn provide excellent showings of larch. Larch can be found higher, but their numbers are greatly reduced. A central camp to easily access all these areas is recommended.
My Recommendations:
 |
| Prusik Peak above frozen Gnome Tarn. |
Lake Vivian: I have not photographed Lake Vivian, though having passed by it many times, I believe it to be very photogenic. It offers a lake set in granite amidst larches, and a unique perspective of Prusik Peak above. I'm not sure Prusik is very photogenic from this side, however. I would probably tend to focus on the lake itself. I hope to spend time photographing near its outlet stream, as well as up high from an obvious overlook along the trail. I've always found myself passing through this area during the middle of the day, and camped too far away for a comfortable visit.
Leprechaun Lake: I've always liked Leprechaun Lake. It is lined with larches and offers excellent views of Prusik Peak and The Temple. It's a large lake and subject to windy conditions. I would suggest the chances of catching a reflection as slim to none. However, don't despair! Locate the trail that explores the peninsula of the lake. At the very end are some tarns, one of which catches a beautiful reflection of the peaks above in late afternoon/evening, which is when the best light arrives.
There are many other excellent compositions to be had around this lake. Be sure and check out the south shore. A fun exploration to get there can begin from Sprite Lake. More on that later. There are also some beautiful tarns between Leprechaun Lake and the climb to Sprite Lake, and an interesting stream.
 |
| Upper Basin from Gnome Tarn. |
Sprite Lake: Sprite Lake is a small gem of a lake encircled by larches, just shy of Perfection Lake. It's quite pretty and often photographed. If offers a small waterfall at its inlet from Perfection Lake, sandwiched between larches. Its outlet stream lines up to perfectly frame Prusik Peak. There is excellent photography to be had from each and every side of this heavenly lake, which can hold an early morning reflection. From this location, don't miss first light on the buttress above Perfection Lake to the west - it can turn a brilliant red in the right conditions, and reflects nicely if the water cooperates.
Wandering east off-trail from the lake, several tarns can be found, and much exploration around them. I've spent an entire day playing in this area, and using it as a shortcut to access the south shore of Leprechaun Lake below by traversing around a knoll.
 |
| Prusik Peak above frozen Gnome Tarn. |
Sprite Lake is also the popular jumping off point to visit Crystal Lake. There is no camping at Crystal Lake, but it is a beautiful lake in a granite cirque with lots of interesting rock features and some larch - well worth visiting.
Perfection Lake: Perfection Lake is a very large lake with a prominent buttress to the west, and larches all around. The basin at its head offers excellent groves of larch, and also serves as the junction with the Prusik Pass trail, which gives access to Gnome Tarn. Campsites with incredible views can be found along this lake. Goats are common residents here, as they are above.
 |
| Prusik Peak above larches and Perfection Lake. |
There are many excellent vantages immediately around this lake for photographing, the best at or near the lake's head in my opinion. For higher and much more encompassing views, follow the Prusik Pass trail up to Gnome Tarn, then gain the ridge above for unobstructed views back down to the lake, as well as Inspiration Lake and into the upper basin.
Other high views can be found by following the trail up to Inspiration Lake and locating the side-path near its outlet stream at the far end (before the steep climb). For even higher views, continue with the steep climb up beside the waterfall. At the top, take the side path east to the top of the prominent buttress seen below from Perfection Lake. The views are superb!
 |
| Photographer and upper basin of Enchantment Lakes. |
Inspiration Lake: Inspiration Lake is set in a deep cirque. It's very scenic with larches lining its shoreline. Isolation shots work well here. Also, larches can be reflected in the lake. Views from above the inlet waterfall are also very nice, allowing the inclusion of Prusik Pass and even Prusik Peak (though the later requires some work to successfully compose).
If you are staying at Inspiration Lake, make sure to follow the outlet stream to views of Perfection mentioned above.
 |
| Prusik Peak above Gnome Tarn. |
Gnome Tarn: Gnome Tarn offers the iconic image of Prusik Peak from the Enchantments.
For the easiest access to this lake, go to the junction at the head of Perfection Lake and take the Prusik Pass trail.
Many compositions can be had around this small tarn. It holds a reflection of Prusik Peak well. Add larches in season and the scene becomes...well, enchanting!
This scene is best photographed shortly after sunrise, once light has had a chance to light the rock of Prusik and the larches below. If you arrive at or before sunrise, continue up to the ridge top to get above the larches to the south, and catch first light on the peaks of the upper basin - breathtaking!
 |
| Photographer in the Upper Enchantments. |
The Enchantment Lakes are an incredible place to visit and photograph. I would recommend budgeting at least five days for your visit, giving you an approach day, three full days to enjoy, and an exit day. More days would be even better.
Having painted this area in such glorious light, I must also take time to stress some safety considerations.
Understand the physical challenge required to get into the Enchantments and make sure it is within your ability. Both routes are physically demanding.
Choose your gear carefully and be conservative. Ounces add up quickly. I recommend a wide-angle and medium range zoom lens, along with polarizers and GND filters for your camera gear.
Be prepared for the weather and elements. The Enchantments can offer winter conditions at any time of year, and do. October can be particularly cold. During my visit, a group of photographers coming over Aasgard Pass in a blizzard learned this the hard way. It ruined their trip. Meanwhile, we found ourselves wearing
all of our layers,
all of the time!
I hope to have some of these images from my latest trip available on my web site soon. In the meantime, feel free to check out images from
previous Enchantment trips, or peruse
other galleries of my web site.
If you have any questions, feel free to drop me a line.
As always, thanks for visiting!